Material Xploration x PDUG18

It’s been a while since I blogged about a course at NID. I generally make a point of sharing my experience in a blog form. But lately, I have been super busy with things at NID and this lockdown is now giving an opportunity to write about the module I did with the talented folks of batch PDUG18 who have a bit of shit taste in music (a bit, initially :D)

I was asked if I would be interested in taking a 3 week long Materials and Manufacturing module for 4th sem 2nd year product design undergrad students. And being an tinkerer, it was one of the best learning and facilitating opportunity and I said yes to it! And coincidentally I was in the 3rd sem jury of these guys and after the jury got over I asked them for doing a brief meeting of 30-40 minutes in which they can share their expectations about the course, what would they like to explore and what are their holiday plans. I was glad that I spoke to a few and Nitya, Anvika and Amogh ended up being part of STEAM school at Maker’s Asylum.

So, the first day of the module was like any other module at NID which is spent waiting for everyone to show up. This is one thing which I still haven’t been able to decode that why it’s difficult to show up on time. Once everyone was there, we started with what is material, where does it reside, what are the properties and all the boring mundane stuff. Too be honest it did feel like a conventional class where students immediately turn into zombies the moment you as them something or what are they expecting. There’s a dead silence!

So, I thought it’s not going to work like this. I asked them that what do they think of paper (the material which we have been the most exposed during our lifetime in one form or another) and I would like to see them explore and experiment with paper. I didn’t tell them what to do, I just told them that the material is paper and told them to get going and asked them to make some quick stuff so that I can come back after some time and see what are they upto. They initial exploration to be honest were really bad and sub standard. So, I gave them the rest of the day off to make stuff and who the next day.

Next day was the same story, some people showed up with some samples and others were still in the overhang of physically being there but mentally being in some other parallel dimension. So, to get their attention, I picked up Anvika‘s honeycomb paper exploration and asked the guys to give their laptops one by one and started stacking it on the honeycomb. Most of them very sweating from inside as their Alienware, Legions and Macs were being put on top of each other. We ended up putting around 8 laptops over each other (roughly 18-20 kgs) on a honeycomb made out of copier paper. This got them excited and amazed, they learnt about stiffness of paper in an experiential manner rather than stiffness constants and compressive strength.

Anvika Honeycomb

Laptop Experiment

The overall experimentation with paper was good but it was still limited cause it was still seen as a course where someone comes talks something, asks student to produce some object and its done. It took some time for them to come out of the mindset that if a faculty has asked for 5 exploration, it doesn’t mean that you stop doing things once 5 explorations are done.


While we were talking about all this we came to a point where we started talking about minimalism, what it is, how does one object end up being minimal or dynamic or playful. These sort of off topic conversation were a normal part of class, as there was no day to day agenda but a bigger plan, it worked well. We were learning about things at pace which was comfortable. We forget that people learn at various pace and the one size fit all teaching methodology can lead to a lot of frustration, anxiety and cognitive impairment.

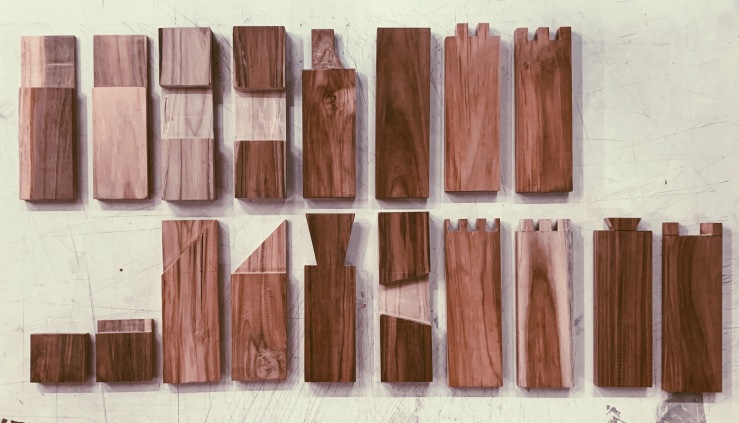
From minimalism I wanted to take the conversation to hand craftsmanship and Japanese master carpenters. So, we started talking about wood and what prior experience the class had with it. We came to the conclusion that basic wood joinery was not taught and we started talking about what are the different sort. I quickly took them over to an image of various joints and gave a brief idea about how it works. They we got down to the discussion of making one joinery in a pair. Hari and Kishan being over enthusiastic said that half lap joint was too easy for them, so I ended up giving them a dovetail. We ended the class in the afternoon and everyone was given a wood joint to make in a pair using hand tools only and then show it the next afternoon.

Initially people thought that how difficult would it be to take two pieces of wood, cut them a bit and join them. Big deal! It turned into one. As the prior experience was rather elementary they screwed things a bit, most of the hand tools they had needed sharpening and they didn’t know how to sharpen it. So, I was going to each group and talking to them and helping them figure out things and sharpening tools. Afternoon they were back in the studio with their wooden joineries and a smile on their faces.

Processed with VSCO with p5 preset

We laid the different pieces on the table and started discussing what happened during the exercise. Some observations

  • Huge gap between what’s in the head and what’s in the vise
  • Seemingly simple things are practically difficult to make
  • Appreciation for the people who deal with wood on day to day basis
  • Importance of having proper and maintained tools
  • Technique is important
  • A lot of elbow grease is required to convert ideas into reality
  • Making helps in enhancing confidence and in equipping to take bigger and more challenging tasks

There was one thing which I did mindfully during this exercise and throughout the course. I wasn’t giving them ways of doing things directly, we were watching videos, talking about processes, what worked and what didn’t. They figured out things on their own, they were creating their own paths, I was just helping them navigate.

Their enthusiasm and attention improved and they became more involved in the class rather than being the passive zombies they were initially.


I’m breaking the blog into chunks but there was continuity in our work and one thing was plugging into another. Next we started talking about what are the various manufacturing processes and everyone ended up picking one process and then they prepared 2-3 slides per person and we had a presentation the next day. I think that’s the only official presentation presentation we had.

I was also showing them the alternate ways designers are working globally and I shared the work of Dave Hakkens Precious Plastics and they seem to be interested in. So, our next assignment was to grab hold of some plastic sheets, an iron box, some butter paper and arrive into the class next day.

Next day we had all sort of plastic, colored, opaque, bubble wrap etc. Again there was no agenda beside trying to layer some plastics and see what happens. It’s like unstructured play with some goal which is defined by the person. We had people pick flowers, leaves, crayons, colored cellophane sheets, fabric, yarn, water all being sandwiched and this was being done in the studio and people could walk around and see what others were making which in turn was triggering everyone. I was playing music in the background to set a pace (this was the first time we started listening to music collectively as a class). There were so many interesting experiments being done and everyone was fully into the activity and people were freely exchanging “Abe, yeh aise kaam kar raha hai”, someone was cutting small confetti, someone was making composition, someone was putting crayon shaving as a layer and some one was creating colour interaction. After about 5 hours of experiment we put everything on the table and everyone was supposed to pick one sample they liked and one they didn’t supported with a reason. So, we shifted from actively making into actively critiquing and giving feedback. And it was made clear that critique the sample and not the person.

After this we had a break for a week as they had another module. But I kept bumping into them and talking about what’s going on. By the end of the first week, They had started taking ownership of their own learning. They were exploring and not getting into how many samples did they make, if they were done with one they started another one.

In the meanwhile we were talking about the places to go and eat. As I have spend considerably more time in Ahmedabad compared to them and being a masters student who have to stay outside I had explored the city. I told them a couple of places where they could eat. And some of them ended up going there and sending me emoticons expressing their happiness on eating at those places.


Our next session started with Leather and casting at the same time and we shifted our operations into User Centred Design Lab (It’s a long name for a lab). We got into exploring leather as a material and what are the tools, methods and processes. I do leatherworking so I had the tools which I brought to the class and I also got some leather samples I had made and explained how they were made. We started sharing inspiration boards and the objects we liked in every session. So everyone made a quick single slide on google slides with references of products they liked and which among them would they like to start with. The slides were also populated with memes in between which made the exercise of going through these informal presentations more fun and engaging. Sometimes laughing at Memes in a classroom can bring people together. After they had made up their mind we got into sourcing of materials, they went in groups to get leather, hardware and other things. Nitya and Pranav didn’t want to work with leather and they backed their choice by valid reasons. So, we started looking at alternatives, I had known that there is a store which sells Tyvek and it could be an interesting material to explore, also cork was shortlisted. These guys went to the store and somehow managed to get free samples and they also got duped by a guy who sold them some cheap quality weird plastic as cork. Once all the material was in the lab these guys got into figuring out patterns and other things. They handled the material really well and did all sort of explorations. One of the thing which I had to demonstrate to everyone was saddle stitch and how to burn off the thread after stitching is done.

One of the main learning from this exercise was material sourcing and how to figure out alternatives.


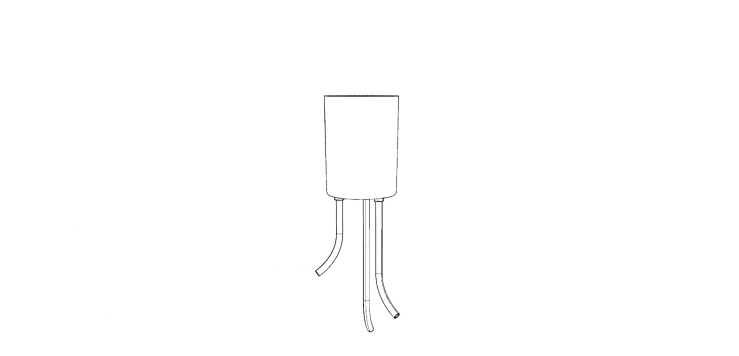
As they were making the leather objects another exercise was introduced. They had to make two positives for casting and the constraint was that it needs to fit within a 7cmx7cmx7cm volume. They again shared inspiration boards and the objects they liked . They finalized the objects and in between started making them. They used different materials like mseal, mdf, polystyrene etc. They were multitasking and figuring out how to take care of things simultaneously. On the last second last day we put some of these positives into silicone to make some moulds. Working on a small scale can be challenging and when making objects for casting it becomes important to factor in things like the parting lines, draft angle, undercuts etc.

We also had a brief presentation by a WPC manufacturer during the course.

This exercise helped them visualize things in 3 dimension and from a specific perspective of spatial orientation of the object.


Paper Weaving Workshop by Mayur Bhalavi

I wanted to expose these guys to a slower process which is labour intensive and needs cooperation. Mayur has been working with paper for a couple of years now and teaches self help women group how to make objects out of waste newspapers using various techniques like coiling, paper tube weaving, forming etc. So, this workshop introduced them to what happens when a design process is intuition driven where the end user could be the designer him/herself. The venue of this was shifted to Foyer where these guys took up the space and Mayur got down to explaining them the process of making paper tubes out of newspaper, then joining them and ultimately weaving baskets out of them. Mayur finished his workshop with sharing his design process, inspiration, work he does with the women basket makers and ideology. After that everyone applied a coat of varnish to protect their baskets. In this workshop they learnt an alternative way of practicing design which is more participatory in nature. We all went to Noorani to have food at night and then to Sheetal for having ice cream. It was pretty fun.

In this workshop they learnt an alternative way of practising design which is more participatory in nature.


The Final exercise they had was to make a music instrument. That’s it. I didn’t tell them what I was expecting or what works and what doesn’t and by now they were a bit used to getting open ended briefs. They were a bit puzzled in the beginning and they we saw a couple of videos of people making simple music instruments. They started slowly and started exploring various materials. They were trying to check every material for its acoustic properties. Someone was hitting a piece of bamboo with a stick, someone was making clay bodies with stones inside, someone had a stretched rubber on top of a bamboo section. It was a chaos, they were making so much noise that when one was walking in the wood workshop they could clear hear the incoherent noise coming from Science lab. This went on for 3 days and eventually they fine tuned their ideas and instruments. We wanted to have a small performance but due to lack of time we couldn’t. We ended up with some pretty good looking and sounding instruments.

This exercise was sort of a culmination of whatever they learnt in the past weeks. Cause making an instrument is not a simple thing, it involves a lot of material properties.


On the last day we didn’t work, we saw some videos in the morning and spoke about design in general and what works and what doesn’t. After lunch we put all the things which were made on the table and started arranging. Once everything was arranged everyone was told to go around the tables and pick one object which they thought was well executed and one which they thought could have been better. They took some time as the number of things on the table were a lot.

Last Day 1

Then we sat down and set a guideline that we are critiquing the object and not the person who made it. They gave a reason for the well executed and the one which could have been better. This was just a warm up for what was coming next. As these guys have known each other for almost two years, they still didn’t know their strong traits and things which needed to be worked upon. So, one by one everyone told each others these points, it took almost 4 hours. And at the end of it people cleared a lot of things which were in their mind. They were being open to each other and telling things without feeling judged.

And finally to finish off a course grades need to be given. So, these guys had to grade each other as a class. I asked them if everyone should get the same grade or different. They unanimously said that it should be the same for everyone as from the beginning of the course it was said that the purpose of this course is to learn and not to compete with each other and everyone was supposed to help each other and set benchmarks, which they did. And it seem like a good reason for getting same grade. I wrapped up the class with giving my feedback to everyone, they already had covered most of the points when they gave feedback to each other.


Things which we learnt in the modules:

  • The learner should set realistic goals they want to achieve and the faculty has to facilitate them in doing that.
  • People learn the most when the learning is highly personal. Though the briefs were same for everyone, they ended up coming with things which they held close to them.
  • Ownership of the process should reside with the learner and not the facilitator. If you cannot own your own work and process then the learner ends up doing things for the sake of doing them.
  • This module was to give Designers an orientation of engineering, materials, manufacturing processes and practices. It aim was not to make them engineers. I didn’t expect them to become engineers in 3 weeks and understand all the technical know how. Designers use materials very intuitively and in a tactile way. We did talk about technical terms and there meaning but they went around exploring the properties in an experiential way and not theoretical.
  • The facilitator needs to create an ambience of experimentation in these sort of courses. There should always be plan B. People should feel comfortable asking questions, trying things out and failing. The process should be given importance rather than the final outcome. Though we never gave importance to the objects, we did end up with a varied and extensive exploration.
  • The goal of design or any sort of education is to make sense of the world. They were doing a process of sensemaking through experimentation and explorations.
  • The facilitator needs to be updated with the present practices, processes, materials, technologies, memes (really important).
  • We were playing music most of the time and it was one thing which brought a lot of people together. They were not only exploring things but they were having fun and enjoying the process. As Oki Sato of Nendo said “The word FUN is in the term Function”, having fun is really important otherwise things become too mechanical and mundane.
  • I had numerous conversation about my own experiences and how everyone has their own design process which they need to figure out and it can be emergent and evolving rather than being the standard IDEO method. As these are undergrad students it was interesting to talk about what they think about the world and how they view it. We spoke about food, books, music, meaning of life, our purpose on this planet, anarchy etc.
  • It would not have been possible without the participation from both they sides. It took a lot of effort to be there most of the time and engage with them actively and I think it was one of the good experiences of being at NID.
  • Age doesn’t define someone’s knowledge and everyone has something to offer.

What some of these had to say about the module (They were asked to write a 1500 word writeup)

The learning in the course was done with the aim of trying of what I could do if I had no limitations which is very important for a designer to design and which doesn’t let him or her do it only for the sake of an assignments. It was a course which had freedom of doing what you believe in.

For me learning about materials by making objects out of them has been an apt approach. One can always read about a 100 different materials and still don’t know about the behavior of any one of those as they must not have tried working with those materials.
Not striving for a set outcome but rather choosing something that I like to do is an equally valid process to follow. Simply put, it is a lot more enjoyable.

The idea of making objects with your own imagination figuring out the process and decoding the steps required to do so is the part that is most enjoyable.

It taught me importance of group working and creating an working environment, the importance of hands on experience of materials and objects, the sensitivity to handle materials within their parameters and still get some outcome and also the importance of believing that you can do it and that things can be figured out if thought about logically and rationally.

In the end it was a celebration of us playing with materials. Having fun. Watching videos that has nothing to do with Materials and manufacturing.

Materials and manufacturing, sounds like a technical course isn’t it? But who knew these
three weeks would be one hell of an experience, one that would be filled with fun,
enthusiasm, knowledge, music and of course materials.

Knowing about a material through the internet or through any written content,
and knowing the material by actually working on it is totally different. So hands-on approach played an important role in the course.

A lot of other things were said but that is protected under faculty – student confidentiality 😀

I had an amazing time with these guys. They are a bit better equipped to take on the world and I know they will do good work.

PF-10 Face Shield

The pandemic COVID-19 has hit everyone in the worst possible way. I have been in a lockdown since the past 40 days. One of the worst thing that can happen to people who create and make things is to be stuck, feel helpless and the feeling of not being able to contribute.

I have been working with open source and in makerspaces for a couple of years now and during the initial 1st week of lockdown I tried to figure out ways to contribute while being at my house, I joined groups on Facebook which were looking at using power of collective to tackle the challenges C-19 was throwing. I saw people making 3D printed shield, cotton masks, ventilators and all sort of possible frugal ways of dealing with C-19. I got a call from my friend Samir Shukla about looking into DIY, low cost ventilators. That took me down a rabbit hole for some days and one thing which I figured out was that ventilators are not super simple devices to make, there are so many variables involved which if not factored in properly, it can actually do more harm than good. I felt super discouraged and useless and was moping that I cannot of of any use to people who need help. It took a couple of days for the gloomy feeling to subside.

I was also talking to Praveen Nahar about figuring out some way to do something. So, one day I went to NID (it’s around 1km from my house). And I dug out all the file covers and anything which was in my office to make a shield. I used PP files, some felt, staples and ended up making two really lo fidelity prototypes which fit well and then I had a discussion with Praveen that what can we do about it and we also ended up calling Samir, who along with a couple of Plasma Research Scientist ended up at NID. We discussed different ways to make the shield, coat the shield, disinfect the shields while following social distancing. A bit encouraged with the discussion, me and Praveen decided that we should prototype shields which could be used by Police and other frontline workers.


There was one thing which we were mindful before we got into the act of making. Rather than reinventing the wheel, we looked online for open source designs and then thought of replicating them without and modification and evaluating it. So, I got to work and screened for open source shields but this was not a mindless hunt, we had already set up constraints and features. They were:

  • Simple making process: We definitely didn’t want to get into making 3D printed shields as it takes too much time and is resource intensive. Lasercutting, Hand cutting etc were far more suitable
  • Made out of off the shelf material
  • Monomaterial
  • Simple to assemble
  • Simple to use
  • Could be replicated using a machine or with hand
  • Scalable
  • Replicable
  • Reusable


So with these constraints, I ended up shortlisting the following open source designs

I also designed some on my own. We (Me and Rohit Bhai) laser cut the design out of A3 Size lamination sheets as they were the only clear stock we had. And after cutting all of them me and Praveen did a detailed discussion on what works and what doesn’t. We evaluated them on the constraints and features mentioned above. We ended up shortlisting M-19, Foster + Partners, Happy Face, Kiwi, Open Face and one of my design for the next phase.

First Prototypes


During the next phase I heavily modified the shields for our local context, needs and feedback on the previous designs. I was sharing the progress on instagram and with doctors and was getting a lot of feedback which I was incorporating in all the variants. Doctors said that it would be nice to have the forehead and ears covered to an extent, police said that it would be nice to have something which is structural and doesn’t fly off if they have to suddenly ride a bike. And we again re-evaluated those and shortlisted some of the features that we wanted.

I would write about two specific shields

  • Heavily modified Happy Face

So I made a massive change in design, I elongated the flaps around ears and also increased the front flap in front of the forehead. The bottom was also modified to fit snuggly compared to the original design. The one on the left is modified and the right one is original.

  • Kiwi Face Shield

I modified the bottom to make it fit snuggly and also increased the overall length of the shield to cover the forehead properly. The one on the left is modified and the right one is original.


So, at the end of day 3 we decided that Happy Shield, Kiwi, PF-10 Lo Fi and M-19 is something which will work for us.


Next day Me and Rohit bhai had to go out to get supplies like various width elastic, PC (Polycarbonate), HIPS (High Impact Polystyrene) sheets. We got some of the shops opened as we were doing it for the good of the frontline workers and the suppliers were very supportive and ready to help. In the meanwhile we were also looking to cleaning and disinfecting supplies like IPA, gloves and masks. So, we used this opportunity to get supplies as a user testing exercise. Me and Rohit bhai used the shield for almost 4-5 hours while we were out and it helped us do minute changes like the headband needed more secure way of attaching to the shield so that it doesn’t come out. Wider elastic would be better suited for comfort.

Modified Kiwi Shield being user tested


On day 4 which was Saturday, I got a call by Samir that police would like to test some of the shields. So, I have reevaluate our designs for manufacturing, as we only had A3 size sheets we had to discard the modified Kiwi shield as it take a sheet almost 1.5 times an A3 one. We selected Maker’s Asylum M-19, Happy Face bottom modified, Open Face PPE bottom modified and PF-10 Hi Fidelity version according to our experiences.

We picked them cause of the following reasons

  • M-19: Quick to make, easy to assemble
  • Happy Face: Quick to make, structural because of origami fold, can be easily put on
  • Open Face PPE: Quick to make, easy to assemble, can be easily put on
  • PF-10: Quick to make, easy to assemble, can be easily put on, structural

We ended up making around 40 shields as each had to be placed and then lasercut. Disinfecting the shield took the most time and effort. Each shield has 3 components: Clear Shield, Headband and Elastic. So, we had to disinfect around 120 individual pieces and it took us around 2 hours. He handed out these 4 different shields to police and explained them the assembly, disinfection process and the most important information of wearing at shield with a mask. I asked them to send me feedback after a couple of days of use and some pictures if possible.


So, after 3 days I got a surprising feedback that the PF-10 Shield which I had made was the prefered one because of the following reasons:

  • Maintains the distance of the shield from face
  • Doesn’t come off when being used on a bike as well
  • Easy to put on the head, doesn’t slide down
  • Covers most of the face
  • Easy to disassemble and disinfect

There were a few suggestions which were made

  • Head band, forehead and chin locking can be improved (this is same across all the designs)
  • A wider elastic strap can be accomodated.


With these feedback and suggestions in mind I made the required changes and prototyped them and tested them myself. And during one of the days when I was heading home after finishing the prototyping I met a group of 10 policemen, I asked them if they have been using shields or if they have been given any or if they would like to get some and use. They said that they would like to have some.

So, the next day me and Rohit bhai produced another set of 20 PF-10 shields, Sweety helped me disinfect it and in the evening the policemen came to NID and I showed them the assembly, disassembly, disinfection process and the importance of wearing a shield with mask. They were pretty happy to have two shields per person. They can use one and disinfect the other.

PF-10


PF-10 Face Shield

I’m putting the A3 size pattern PDF file of the shield in the blog post. You can download it and can make it using a cutter or a scissor and by any other digital fabrication tool. PF-10

If you need lasercutter dxf files then send me an email.


PF-10


Specification of the shield

  • Material : A3 170 micron OHP Sheet (Cellulose Acetate) (You can substitute it by a similar thickness clear sheet like PETG, PC, PP, Acrylic)
  • 20-25 cm long 1/2 inch wide elastic band
  • Staple Pins

Assembly Video


Important Information

This design for a flat pack laser cut PF-10 Face Shield by Sahil Thappa, Praveen Nahar & Rohit Mistry is licensed under a Creative Commons Attribution-NonCommercial-ShareAlike 4.0 International License.
(https://creativecommons.org/licenses/by-nc/4.0/legalcode#s2b) (“the CCL Terms”).
As set out in Section 5 of the CCL Terms, no representations or warranties of any kind concerning the Design are given.

By downloading and or using the Design files, you:

  • accept and agree to the CCL Terms
  • acknowledge that:
    • this Design has been created by Sahil Thappa, Praveen Nahar & Rohit Mistry in response to the global COVID-19 pandemic;
    • Sahil Thappa, Praveen Nahar & Rohit Mistry have no prior expertise in the design and manufacture of Personal Protective Equipment (PPE) and therefore this Design has neither been made by reference to any specific regulations nor subject to any formal testing regime;
    • that any user of the Design shall assume all responsibility for developing the design in conformity with regulatory and testing requirements of any markets it intends to make the visor available in.


Sahil Thappa, Praveen Nahar & Rohit Mistry have not undertaken any testing of cleaning procedures for the face visor whether specifically for COVID-19 or otherwise. Users should follow their own organisations procedures for cleaning and sterilisation subject to testing the effect of the chosen cleaning solution and method on one visor first and then thoroughly inspecting the integrity of the visor and its component parts before adopting the chosen method more widely.

Some information has been made publicly available on how to clean OHP (Cellulose Acetate) and other clear visors on Prusa Research website. Whilst this is in respect of a 3D printed design, similar cleaning methods may be appropriate for shield, subject to testing as stated above. Due to COVID-19 being a new enveloped virus, the efficacy of the standard decontamination methods are not fully understood at this stage. However, at present, this existing knowledge offers the best available approach. Please note that Sahil Thappa, Praveen Nahar & Rohit Mistry are not responsible for the content of external websites and it is recommended that you undertake your own due diligence to ensure the face visors you manufacture or use are safe.

How to clean the face visor
The visor should be fully disassembled prior to cleaning. Users should follow their own organisations procedures for cleaning and sterilisation subject to testing the effect of the chosen cleaning solution and method on one visor first and then thoroughly inspecting the integrity of the visor and its component parts before adopting
the chosen method more widely.
WARNING: Before you apply any disinfection solution, we advise testing it first near one edge of the visor and inspecting whether the solution has caused damage to the surface of the visor.
Hospitals and other medical workplaces may choose to use their professional sterilising equipment to decontaminate the face visors. Again we advise sterilising a single visor using the chosen method followed by a thorough check for possible damage prior to adopting this method for cleaning the visors more widely.
Always use appropriate PPE when handling decontamination fluids, chemicals and equipment and follow your organisation’s guidelines on the same.

How to store the face visor
There is still debate about how long the virus survives on plastic, but most sources say 2-3 days. By letting the packed face visors sit for 2-3 days before distributing them, you’ll greatly reduce risk of transmission. Please do your own research to understand the most
up-to-date information on this issue.
Do not store the entire stock in one place to minimise the risk of cross contamination.
Always sterilise the visors before use.

Always wear a shield with a recommended mask. Shield is not an alternative to a Mask.


What did I learn from these 5 days of prototyping:

  • In scenarios like this getting credit is the last thing which should be on someone’s mind. The problem is way bigger than our personal gain and egos.
  • There is already a vast amount of data and information available. You need to filter it out according to your context and need.
  • Reinventing the wheel is not important. You need to just figure out what is already available, replicate it without using your brain and see whether it fits your need, if it does then you just spread information about why I works and give the due attribution to the person from who your got the information. If it doesn’t fit your needs then tinker with it, take out elements from different variants and start putting them together.
  • It was only possible because of a collaborative effort, I was creating and testing out designs, Rohit bhai was taking care of sourcing the materials, cutting it and helping in all the other things, Praveen for facilitating in doing this prototyping, discussions about what works and what doesn’t work, inputs, Jasswini and Praveen Kaka for all the help, the guards at NID for not giving me a hard time everyday while entering NID. I haven’t done this on my own, we have done it.
  • What seem to work in a closed setting needs to be verified and you need the real user to be in a participatory position.
  • It can be difficult to get out of your house and to be honest there were times when I thought why am I doing this? There is a probability of getting infected but then I always came back to the point “If not now then when”. I know it’s really hard for people to be productive during times like these and it’s okay to be not able to do what you could have done on a normal day. We all need breaks and everyone has a different coping mechanism. Maybe prototyping was my coping mechanism to deal with the lockdown.
  • You can use the same framework of looking at already existing resource, replicating them, evaluating them, remixing them and re appropriating them to your context and need. We moved on to a new project of Elbow and Foot door openers using the same framework and it worked pretty well.


P.S. The name PF-10 is a dedication to Pink Floyd, they have been helping me to get up everyday and do things for the past 15 years. Also PF could mean Police Force. The Number 10 means the version which was the final one.

Guerilla Furniture

I moved into a new unfurnished flat a couple of months back and thought that this was the opportunity to build furniture which would cater to my specific needs.

I came across a book by Will Holman called Guerrilla Furniture Design (How to build lean, modern furniture with salvaged materials) two years ago. It stated four values which made a lot of sense to me and they are:

ECONOMY: Each project is an exercise in material, visual, and fiscal efficiency, built from the by-products of the modern consumer industrial complex. A guerilla designer should maximize resources, minimize waste, and leverage available assets.

HONESTY: Materials bear a patina of time and marks made by the passage of human hands, thus communicating their history and potential. A guerilla designer should obtain material honestly and treat it respectfully, avoiding elaborate ornamentation or obscuring finishes.

UTILITY: Furniture is a functional art meant to solve a number of mundane, practical problems. A guerilla designer should strive for ergonomic, stable, structurally sound solutions.

BEAUTY: Beauty is, of course, subjective and elusive. However, if a design is spare, honest, and useful, it often ends up being beautiful by nature. The guerilla designer should develop coherence of form, color, craftsmanship, and conceptual idea.


I decided to make a table, bookcase, bed, chair, stool. I started looking at various types of furniture which people had done. I was also inspired by Ben Uyeda‘s philosophy of using materials which are readily available and not to get too much into joineries. I also wanted the furniture to be flat pack to an extent so that in case I need to shift my house I can take the parts apart and move them easily.

I made a couple of sketches then moved over to CAD to get a rough idea about the proportions and aesthetics of what I was planning of making. I thought I could make it out of Plywood or Pine and I started inquiring about the price and specifications from various timber seller in Ahmedabad.

And it was one of the days that I had gone to buy some metal with my friend Somil that we spotted a shop near Mehndi Kuwa which seem to have huge planks of Pine. We made a stop and got into the shop and it was a Pine wood paradise. Ramesh Bhai, the owner of the shop gets huge planks of pine which are used by shipping industry for. Most of the wood he has is New Zealand Pine which is already seasoned and pressure treated and hence wont warp over a period of time. He sells it by kilogram which when compared to buying seasoned pine is super cheap. I got back home and started making a list of stock which I needed to make the furniture.

After two days I was back in Ramash Bhai’s shop and ended up buying around 150 Kilogram of wood which was then moved to my house using a handcart.

Pine Planks

I started working on a lot of pieces simultaneously. I was making them whenever I was getting time. It has taken around 2 months to finish the loft bed, media console/bookcase, easy chair, Table. I’m planning of making a few stools and a low workbench as well.


The first thing I started with was a loft bed. Since I was a kid I wanted to have a loft bed and this need to have one in the present house got amplified by the fact that the builders who are making flats now a days don’t understand the concept of having a store room, they think that we Indians have started practicing the art of minimal living and just live with a suitcase of clothes.

So, I made a couple of iterations of the bed in CAD and decide to make one which would be around 45 inch high and would help me store most of my things under it. The initial plan was to have a table next to the bed which I could use as a step to get on to the bed but I dropped that plan and decided to use the crates I had as steps.

I started building the bed out of 2″x6″ 8 feet long pine planks. I made a quick frame using a finger joint which I made using my circular saw and compound miter. I used screws to fix the frame. Then I split a 2×6 into 3 pieces which I used to make a centre and side supports for the slats.

Loft Bed

I got 1/2″x3″ teak beading to make slats. I cut these to the required width and fixed it to the side and centre supports using screws.

In the meanwhile I made the legs of the bed using 2×4. I screwed two 2×4 to each other to make an L cross section which makes it really strong and rigid.

I bolted the legs to the frame using 3 M10 nut bolt and some screws. And also added cross members for stability and rigidity of the structure.

I need to attach a curtain around the frame.


I make audio systems (Sonic Architect) and have a couple prototypes with me and I use some of them from time to time and also a Audio Technica vinyl player. I also have around 100plus books with me which because of moving were in a box for a couple of months. So, I thought I’ll make a media console/bookcase for the speakers and books.

I had to glue four huge 8’6″ long pine planks to get a wide board. I used dowels and glue to join two boards to each other.

As I don’t have a thickness planer I had to use an angle grinder with a flap disk to sand these super massive and heavy boards. As sanding with an angle grinder can create a lot of fine dust, my building guys suggested me to move to the basement of the building where I would not disturb anyone and also not make the entire staircase covered in saw dust.

Console

Once the sanding was done. I cut 2 pieces each from the two boards which were to be used as two sides and two vertical partition.

I had to free route rabbet and dado to fixes the vertical parts. I used dowels to align the panels and then used 2″ long screws to fix the book case and then used some of the cutoffs to make the legs.

As these were rough cut boards the front of the case was not entirely flat. So, I glued teak beading on the front and then flushed it to the panels using a flush trim bit on my router.

I oiled the front of the book case to make it look more rich. It houses a lot of books, my current setup of Audio Technica LP60 vinyl player, Bookshelf speakers, some old prototypes, a couple of toys and lights.

Console


I wanted to have a chair which I can just use to relax, listen to music or read. I wanted to have a hybrid of a lounge chair and a deck chair. After making a couple of CAD variations I decided the form and made a cut list.

I used 2×4 pine planks for making the space frame. I used screws to assemble the entire frame. And then sanded it using the angle grinder.

I wanted to stain the frame cause all the furniture was turning into this yellowish white pine. I used black oil based Taralac stain and the frame came out super nice. Then I finished the frame using Lineseed oil.

I used 1/2″x3″ teak beading for making the seat and back rest of the chair. I countersunk all the screw holes so that the screws don’t damage the clothes or poke. I screwed in all the slats and then stained the first two slats of the seat and backrest black. And then I oiled the entire chair.


I had started working on the table when I started the bed. It took the most amount of time cause I was finishing the chair and console in between.

To make the table top I glued together 4 pieces of pine using glue and T-Bar clamps. Once the glue had dried I sanded it using the angle grinder. The table top had a lot of holed and cavities which I filled with the sawdust and CA glue.  I chamfered the bottom edges of the table using my router and chamfer bit. I sanded the top again one last time.

I applied a coat of Lineseed oil and then furniture wax on the table top and let it dry.

I thought of a lot of ways to make the table legs. I thought that I’ll just make a very boxy frame and fix the top, I though I can get tapered legs turned and can make a mid century style frame. Maybe cause I couldn’t decide what sort of frame I wanted, the table took the most amount of time.

So, I finally decided that I’ll use rectangular sections as legs and will fix them at an angle from the table top and not as a boxy setup. I split two 2×6 cross section pine and made an apron and leg assembly.

To give it a light appearance I fixed the apron at an offset from the table top bottom side. This also helps in managing the chords on the table. I’ve also attached an spike stripe on one of the leg.


The next thing I need to make is a stool which I can use to work on the table. Right now I’m using a bamboo stool. I still haven’t decide how the stool is going to look. Once that’s done, maybe I’ll finish it in a couple of days.

I also want to make a low workbench, which I can used for leather working, woodworking and eating food.


There were a couple of things I learnt in this process of making Guerilla Furniture

  • Things take time and it’s okay to be slow. As I was making the furniture for my own use I wanted it to be done in a very specific way and that took a lot of time to figure out. And as I was also working with material which was huge and bulky, I couldn’t sustain working very regularly. There were days when I was sanding and in the evening I could not feel my hands and arms. I understood that I’m not in a hurry to finish anything and I’m the client so let it happen at whatever pace I can manage.
  • I didn’t try to control things or materials too much and perfection was not one of the biggest criteria. Though the end result looks and functions absolutely well, I didn’t want things to be as precise as it was in the CAD file. I did most of the work on the fly as I didn’t have the tools to make micro adjustments. And in the process figured out that things are going to deviate from the original path and it’s okay if they do. We have to do our best to reach where we want to while embracing the uncertainties that come our way. This not trying to control things did not affect the attention which was given to every detail.
  • Our cities have huge potential to support whatever we want to do. The only thing we need to do is to go out and seek what we want. Because I stepped out and found a place which offered me the same material and that too salvaged, I reduced my expenditure by almost 40%. I met wonderful people like Ramesh Bhai who are helping people reuse and upcycle materials. I bought a couple of tools from local tool and hardware store and in the process came to know what all was available in the city. Ganesh Tools in Biscuit Gali was the store from where I got T-bar clamps, chisels etc. You need to step out of your circle and see what the world has to offer.
  • I generally don’t post stories on Instagram. But this time I thought I’ll share the process of making the furniture on the go. And in doing so, I ended up getting a lot of suggestions and messages from people who were following my profile. Also a lot of people asked me where I got the wood from. So, for once the social media was helpful in giving and receiving information.
  • Making this furniture also helped me connect more with friends. While I was making this, my friends who are in Ahmedabad were following the progress and asking me what stage I have reached. And once the media console was done we started screening movie at our house and the setup is pretty nice. So, we make food once or twice every week and have a group of friends come over and watch movies, play games.
  • I have been making furniture for some time now but this is the first time I did so many objects together and also the scale of things. These sort of activities make you humble in a way as you are making things which are bigger than the normal product design object scale. Also it makes you appreciate people who are doing the same sort of activities. You come to know the handwork and effort is real when it comes to bespoke objects.
  • You need to have really sorted and fundamental information sources. I have been watching Jimmy Diresta, Ben Uyeda, Ishitani Furniture, Mike Montgomery, Chris Salomone and a lot of other makers. These guys have been a source of inspiration, information for me and over the past couple of years have built an understanding of how things are done. A lot of time it seems to an outsider that making things are easy for me, but that’s not the case. It seems easy because I have spent countless number of hours watching and learning from these guys and training my brain about how to use a specific material, which technique to use, what tools to use etc. So, behind every functional, aesthetically pleasing, highly detailed object are countless number of hours spent in research. I’m deeply indebted to these guys for helping me in making things seem simple.

You can check some of the furniture on my Instagram handle or see them personally if you are around Ahmedabad.


What I learnt by Making a lot of paper Hydrangea

I have been on and off origami for a couple of years now and I’ve achieved a fair amount of dexterity when dealing with paper. I’ve been particularly interested in geometric folding which is mostly a tessellation of similar elements either repeated over the entire sheet of paper or similar elements cascading on top of each other.

I was making Muiras, inverted pleates, waterbombs, all sort of repeated pattern and creating some of my own fold. Then I came across this very interesting channel on YouTube called HappyFolding (Sara Adams). I saw the Hydrangea fold (Created by Shuzo Fujimoto) video, which was brilliantly done. I was a bit apprehensive when I started the fold as it involved pushing, pulling and folding paper on itself. I had done these sort of processes on paper earlier but not on a single sheet of paper in one particular fold.

I started with a fairly big (A3 square) tracing paper and heard Sara explaining and demonstrating the fold. One thing which I would recommend a lot of people who are trying intermediate level of folding is that if they are watching a YouTube video, then reduce the speed of the video to 0.75 times if the pace seems to fast. It helps a lot as you can actually get a decent pace and match the instructor. The first ever Hydrangea I made took me around 45 minutes and it came out pretty decent. I used a rosewood folder and a modified stainless steel dental pick (a wooden tooth pick’s blunt end can be used as well).

First Hydrangea

I became more curious about this absolutely amazing cascading tessellation as it could go on growing in the levels of petals until it became too small to fold and collapse. I thought that lets give it a try and make the smallest one I can. So, I sat the next day and made one which was 4.5cmx4.5cm and felt really good and thought that even smaller ones could be done. It took me around an hour to make this 4 layer Hydrangea.

2nd Hydrangea

I became more courageous and adventurous and thought that it would be really challenging to make something which is under 1cm when folded. Hence started my obsession with making a sub centimeter Hydrangea. I took steps to do this. I moved from a 2.20cm to a 1.4cm, 1.4cm to a 1.10cm, 1.10cm to 0.85cm and finally from a 0.85cm to a 0.75 cm.

Webp.net-gifmaker

All this while I was experimenting with various types of paper to get the one which can be used to make the tiniest Hydrangea. I used rolling paper and tracing paper for making the 0.85 and 0.75 respectively. Making the smaller ones took a lot of time as i had to extend the working and dexterity of my fingers to a pair of tweezers and picking tools.

Tools

To make the 0.75cm Hydrangea I used a square sheet of tracing paper approximately 1.5cmx1.5cm. As such small scale, paper behaves in a totally different ways. The crease lines become so small that it gets difficult to distinguish and then on top of that the first collapse is the most difficult cause you need to use around 6 to 8 of your fingers and paper this small cannot be so easily manipulated. It was one of the most challenging and delicate thing I’ve ever made in my life. I wasn’t afraid of tearing the paper, I never had that fear as I knew I’ll start over again and try once more.

While I was reducing the scale of Hydrangea, I was actively posting my progress on Instagram and Facebook, a lot of people were really encouraging and some of them even messaged saying that they believed that I can make a sub centimeter Hydrangea. It was really nice of them to put their faith in an unknown person.

After I got done with the sub centimeter Hydrangea, I started folding other folds on smaller scales and it was interesting to see that I started using the tweezers and picks as an extension of my hands and it became easier as I made more and more folds.

One day I thought let’s try making a big Hydrangea with as many layers as possible. I picked butterpaper as I wanted to have translucency in the model and to be able to see various layers when kept in front of light. I ended up making a 8 layer 25cmx25cm Hydrangea. I found making the bigger one far more difficult compared to the little ones I did before.

After a few weeks I thought that now it’s time to make a tessellation of a tessellations. I started looking at high density Hydrangea. One day I started making crease patterns on my own and tried to make a grid of 2×2 but made a mistake, but the mistake also turned out to be a nice hybrid pattern of square and stars grid.

I found a pattern for tessellation in Shuzo Fujimoto’s book (Japanese instructions) and got down to making it. I used tracing sheet to make a 4 layer 2×2 Hydrangea tessellation and this endeavor took me around three hours.

2x2 Tessellation

This gave me a bit of confidence on making a tessellation and my next big plan was to make a 5×5 one and I again picked tracing paper but it was a bad choice. When you try to fold and collapse 25 hydrangeas simultaneously then a paper like tracing sheet might not work as it’s not stiff enough to create a crease memory. I took around 6 hours in folding the crease pattern and then trying to collapse it. But it didn’t work out. I thought maybe it was me being over ambitious in trying a 5×5.

Failed Tessellation

In the meanwhile I came across this beautiful black paper which could hold creases very nicely and not tear at the same time when folded multiple times on the same crease or when being pushed or pulled. I thought this is a good paper to try a tessellation’s tessellation. I made a crease for a 3×3 grid this time and this time the paper was just perfect for the application and it took me around 4 hour and I ended up with a 3 layer 3×3 Hydrangea measuring 8cmx8cm.

3x3 Tessellation

I still hadn’t given up on my challenge of making the 5×5. So, one day I sat and made the crease pattern on my favorite unknown magical black paper and tried to collapse it. It took me a total of 5 hours to make the basic 1 layer 25 Hydrangea tessellation. I was so tired by the end of it that I left the pattern untouched for another 10-15 days. It took me another 11 hours spread over two days to make a 3 layer (middle Hydrangea being 4 layer) 5×5 measuring 12cmx12cm. This has been the longest (duration) single piece of folding I’ve done in my life and it was worth doing.

5x5 Tessellation


There were a couple of things I learnt in this entire crazy process of getting curious about a fold to a sub centimeter to a large one and finally a 16 hour 5×5 tessellation. Some of them might seem philosophical but they make sense (at least to me)

  • Origami makes you really calm as you are dealing with a medium which is fragile and resistant at the same time. It teaches you to deal with things which could have contradictory characteristics in a very calm manner. I’ll make an analogy of “Responding” rather than “Reacting”.
  • It makes you a patient person. You cannot rush into making the fold as one wrong move could end up puncturing the paper and lay waste to the effort you had put. Things take time and you need patience to go through them and it’s fine if you take your time.
  • Things might seem crazy but if you can keep calm and have patience, you can break the crazy things into deal-able chunks of growing complexity and deal with them one by one. I moved to the sub centimeter and the 5×5 Hydrangea in a evolutionary way and not in a brute attack mode. I built the complexity and dexterity of my hands and brain to deal with the crazy task of doing 16 hour long folding.
  • There are a lot of good people around who share common interest with you and they will encourage you and put their faith in your capabilities. Times when I thought it might not be possible to do a fold, someone sent me a message or told me that they think that I can do it. And this made a lot of difference.
  • Personally origami gets me into a state of Flow and engages my brain and mind. So, a lot of people who find getting into flow difficult can try out origami and once your flow is maintained you can shift to other activities.
  • I experimented with a lot of papers, plastics and structures. Now, I know what sort of paper will work for what sort of folds. So, doing experimentation is really important if you want to optimize and enrich a process.
  • I made a lot of bespoke tools for doing origami, which would otherwise have never happened because there were times when my fingers were too big for the size of the sheet. So, making your own tools is a crucial part of experimentation.
  • I think (or would like to think) a lot of people got interested in origami after I started posting the pictures. Some of them had been doing origami but had stopped and some of them tried it for the first time and were delighted beyond measure.
  • I made a point of giving Hydrangeas to a lot of people. At one point, I was folding around 4-5 Hydrangeas everyday and giving it to people. They were so happy to get one. So, one motivation to get started with origami is to give it to others and to see them smile.

It was an interesting time experimenting with this ONE beautiful fold done by the great Shuzo Fujimoto. I’m deeply indebted to him.

You can check some of the folds on my Instagram handle or see them personally if you are around Ahmedabad.

Summer Time Studio

A lot of people ask me what I do. And I generally tell them that I’m an unemployed Maker, who likes to make and learning new things and help others make and learn things.

So, in the beginning of May’18 I along with two awesome makers Mayur Bhalavi and Divleena made a pact of making new things and learning from each other over a period of two months before Divleena starts her school again. We unknowingly ended up setting up an ad-hoc makerspace in Animation Studio, NID.

Summer Time Studio

We made a list of some things or areas we wanted to work in. Some of them were:

  • Woodworking
  • Leatherworking
  • Paper based object
  • Concrete casting
  • Epoxy based experiments
  • Crochet
  • Textiles
  • Plastics
  • Basic Electronics

We have almost covered the entire list with a few exceptions which we are going to try out in the coming week.

We were experimenting with paper based leather and origami when we made the plan of starting the Studio. I was trying to make some wallets and stationary organizers out of real and paper leather, while Mayur was experimenting with weaving the paper and making wallets. Divleena was doing crochet at that time and she found an empty amazon box and ended up using that and making a container which was a cross over of corrugated cardboard and yarn. And she also made a couple of origami earrings.


Divleena continued with her crochet work and made ear rings, headbands and belts, while also learning a bit of woodworking and made a small box with highlights of threads on the lid. Mayur started an ambitious project after being inspired by the work of Dave Hakkens, He started collecting waste chips, namkeen and biscuit packets and started making strips out of them and weaving them. He then fused it with thin LDPE sheet and made a sheet big enough to make a bag. Then he combined this sheet with paper based leather and made a gender neutral tote bag. During this entire time I doing origami, building new prototypes of audio systems, wooden pencil boxes and experimenting with wood forms and finishes.


While we were doing all this we were letting others use the tools we had and helping them make things they wanted. We were also watching a lot of making videos and learning new stuff. I was also showing Mayur and Divleena around the city and going to places where things are made, repaired and sold. We bought a few new tools and got a lot of old ones from Sunday market. We bought metal, wood, clay and all sort of random stuff.


As a lot of people were leaving for their home and they had a lot of leftover material. Some of them were kind enough to give us a part of it. We salvaged two cushions, one mat, one woven bamboo lamp shade from the textile department and set up a small cozy place in the animation studio. Divleena started doing macramé and it was so fascinating that we also joined her and made a curtain using yarn we found for the small space. We bought light bulb and installed it inside the woven bamboo lamp shade. The place was looking really pretty.


We went to Geetamandir one day to get wood and found really interesting beading which had a beautiful chevron pattern. We ended up buying around 200 of those small beadings and some thicker ones for making patterns with wood. Mayur started making a sleeve for his macbook, a hard drive case and coin purse using the same technique of weaving plastics. Divleena started exploring paper based leather and made a sheath for her scissors and she did a box with wood and paper and then two pouches using paper and felt. I was exploring the beadings and making chevron, herringbone and some other random stuff.


We saw some amazing paper marbling videos on YouTube and we decide to try it. We got ourselves the supplies and tried our hands. I had previously tried marbling and it was Divleena’s first time. It gave us some interesting outcomes. We were also doing some watercolor and illustrations in between. We also tried our hands on wood carving and our good friend Rai gave us her cool wood carving tools. We want to experiment with it further.


We set up a space for 4-5 people in animation studio using discarded AC packaging and it was super duper fun. We setup a small temporary space for 4-5 people using discarded AC packaging boxes which we found in the trash. Setting up the space was super duper fun, everyone got involved. The space is being used by everyone who sits in the Animation Studio.


Lately Mayur has been doing origami and making Master Yoda and all sorts of birds and animals. Dave is also doing some origami, I’m exploring Hydrangea a bit further and made a tessellation of 9 Hydrangeas. Divleena is also doing some amazing Millefiori and making some trippy psychedelic stuff and she recently finished a box in which she used thread and stitching technique to hold pieces of wood together. I’m making new prototypes of speakers using beading and patterned wood.


Next week we are going to try concrete casting, setting objects in epoxy and we are making some headphone splitters, LED reading lights and some more stuff.

Summer Time Studio outcome

Rai helped us with clicking pictures of the setup


What did we learn by doing this small experiment of ours?

  • We never had any concrete plans or ideas. All we wanted to do was learn something and to try out things we never did earlier. We let our moods and interest lead to the things we wanted to explore. Some days we’ll come to the studio and be like let’s make boxes and in a few minutes we would be in workshop helping each other figuring out how to make boxes. And because we saw each other doing interesting thing we didn’t procrastinate.
  • We were not afraid to ask each other how things work and could they teach and explain what they were doing. One day Divleena started making the macrame curtain and it was so fascinating that we couldn’t resist ourselves and left the things we were doing and started making the curtain with her. We didn’t let our age define our knowledge. There was no hierarchy in things.
  • You need intention and drive to do things and some time doing something and setting an example is far more important than talking about ideas and philosophy. There were times when we were making things and people who were using the studio will pass by and stop and ask us about what we are doing and a lot of times they ended up sticking around and making thing with us. Wood carving, marbling and macrame are some of the examples when people came and tried things and the happiness and little joy these activities gave them was worthwhile.
  • The desks where we sit some time became a meeting point for people. They’ll get things they are making and show it to us and we would talk about what was happening with us. We spoke to a lot of people we had never talked earlier and we came to know that they know a lot about the things we were doing. We ended up exchanging tools and books.
  • Tools are important but their dissemination is far more important. We saw that if given access to tools, people can do some wonderful work and come up with different uses of the same tool which we initially didn’t know. A lot of people borrowed leather making, wood working and crochet tools from us and made stuff.
  • You don’t need a fancy set up to make stuff, you need right set of people, mindsets, attitude and behavior to do meaningful things. I have worked in a couple of makerspaces and noticed that they are too tech intensive and people boast that they have this tool or the other but there is nobody using them. We realized that with access to whatever small number of tools we personally owned and which were there in the student workshop, we could make a lot of things.
  • You don’t actually require a permanent physical space to do things. We moved around almost every two week from one place in campus to another. The three of us being around each other was more important than having a permanent space. We got so comfortable working with each other that we sort of know what the other person needs.
  • Having positive and interesting people around is important whether they are making things with you or not. They contribute a lot by just being around inspiring you to do things. We had Rai, Muntah and Somil around us doing their own things which were rarely related to our work but their presence brought a lot of good vibes. Rai with her smile and beautiful sketching made us feel humble, Somil with his knowledge about wood and materials enriched the things we made and Muntah with all his energy, music and architectural work gave us new insights.
  • We built a lot of stuff for others without thinking that we were putting in our own personal time for making things which would be used by them as well. The AC box space was one of the thing we did, people take a nap there, some watch movies, some play games and some just find it interesting that they end up going inside it and them come out with a huge smile on their faces. Maybe these smiles are far more precious and satisfying then getting money for doing some mindless job.
  • There have been times when one of us or two of us or even all of us were down. We gave each other space to deal with things they were going through but we made sure that we would have at least one meal together. We have been roaming around Ahmedabad doing Tripse on my bike (I know not strictly legal but we don’t cross 40kmph). I’ve been around Ahmedabad for past half decade and know a lot more places than Mayur and Divleena. Taking them to places like Noorani Bara Handi and watching them turn joyful after eating green chicken or laccha falooda near Ellis bridge was priceless. We made a lot of new friends in the city, there is a soda auto shop which is parked near AIMS hospital making awesome fresh lime juice and a lot of different stuff; We’ve been going there regularly and if sometimes only one of us will go there, they end up asking where are the others. They smile when they see us coming to their auto. Making these connections is something which is important to the three of us.
  • There were a lot of things we did which were not related to making. There was one thing which was a constant in these two months, whatever we were making or doing all of it was a fun activity. Being in workshop, sourcing material, doing tripse on bike to have meals, watching stuff, pulling each others leg. All of it was fun and it wasn’t a task for us. We saw a lot of movies, videos, heard a lot of new music, exchanged a lot of music, made new friends over the mutual interest in certain type of music, liberated some people (mostly Divleena) by letting them have DJ duty with my speakers. We also played a lot of weird table tennis with a ball which our friend Patil made with plastic packaging stripes.
  • We have been open to others about our learning and helping them in doing their work. Some days back one of the security kaka saw an origami spiral and was fascinated by it and he came one hour before he closes the studio and sat with Mayur and learnt how to make the fold. It was really a proud moment when people who haven’t tried certain things come ahead and take a leap faith to learn something new.
  • And I think we to an extent made a lot of people feel comfortable with the idea of making things on their own and facilitated a few people to get into making things which were outside the curriculum.
  • The most important thing to remember is that making is about making sense of the world, not about the “stuff.” Making connections and making meaning are the true results of making.
  • There is power in participation, co-creation and openness. We all want to help one another. Human beings are like that. We want to live by each other’s happiness – not by each other’s misery. Design is of the people, by the people and for the people.

To conclude, I think that if people are given a chance to make connections and do things they can do wonder and come up with amazing things.

At the end of the day, the goal of making is to liberate our time to engage in exactly that which each of us wants to be doing- instead of what we need to do to survive. All have the potential to thrive.

And if the system is not accommodating you then go around the system and make things happen, sometimes you need to rebel and take a stand for the things you hold dear. 

“Here’s to the crazy ones”

Heres To The Crazy Ones

Image source: Le Monkey House


Some behind the scenes stupidity.


If you like any of the objects and want to know more about them the let us know. Or if want one to be made for you, that could be a possibility.

The Design Jedi of First Order of The High Council of National Institute of Design Vijayawada Part 2

The next three Jedi have shared their work on instructables. These put their head and heart into making these objects.


Making a laptop accessory box for yourself. Tanya was facing the issue of space in her laptop bag and the pouch which she used for keeping her laptop accessories. It is not only very bulky but also takes up a lot of horizontal space rather than vertical, hence making it difficult for her to carry all her stuff in bag. So, She decided to make a laptop accessory box which would use the vertical space of the bag as well as not be bulky. She used Leather and Teak Wood for making the box.

The TUKI stand is a guitar stand inspired by the beak of the Toucan bird. It is portable and can fit inside a guitar cover easily. You can carry it with you whenever you want and can put your guitar on it instead of leaning it against a wall which might cause it to fall. It is made of scrap packaging wood (pine wood) which is easily available anywhere, but you can also make it in teak or any other hard wood. The design was inspired by the toucan bird to give the stand a character. The toucan bird’s beak shaped design signifies a strong and rigid structure.

Medzer is a medicine organizer kit which aims to make the accessing and knowing about medicines when needed, a very easy task. Because many a times, it’s emergency, it’s important that your first aid kit is neatly organized and easily accessible to everyone. Medzer consists of clear slots so that you can know and see each items location in the kit instead of digging through a box of messy supplies. As easy to refill as to sort through, it’s very informative and portable too.

The Design Jedi of First Order of The High Council of National Institute of Design Vijayawada

After doing two intensive workshops with the crazy bunch at NID Paldi, I was asked if I would like to go and met the crazy folks at NID Vijayawada. After teaching at a design school with six decades of legacy, it seemed like an interesting opportunity and experiment.

National Institute of Design, Vijayawada is a design school in VijayawadaIndia. The Institute started functioning on 7 September 2015. It is currently being run in its transit campus at Acharya Nagarjuna University, Guntur, Andhra Pradesh. The institute functions as an autonomous body under the Department of Industrial Policy and Promotion, Ministry of Commerce and Industry.

I was asked to facilitate the 1st Industrial Design batch of NID V, who are in their third year right now. So, before I started there was a bit of a pressure to be teaching the first ever batch of a design school, as these guys are going to set benchmarks for the institute and the future students. The workshop was on the basis of “Making for the Real World”, which was done at NID Paldi. I call them the The Design Jedi of First Order of The High Council of National Institute of Design Vijayawada

Jedi of First Order


I had no clue about how the institute was, what sort of resources they have, how the students were, the skill level, the exposure and also what were they looking forward to. When you have to facilitate 18 people on a one to one basis, it’s important to know they ambitions and aspirations.

We started the two week workshop by informal introduction and then each one of them was asked to tell someone who’s work they appreciated and why. Some usual names were there and some unusual ones as well. Then I shared what was the intentions of the workshop, a basic introduction to making, open source and digital fabrication was given to them.

As the institute is working from a transit campus it didn’t make much sense to get these guys to make objects for the studio space only. I asked them to pick ten things they would like to work on. These could be things they need in their day to day life or something which is missing. Everyone put up their list on the softboards and we discussed as a what each student should be making. Once the domain was decided, these guys got down to do online research and look at similar objects and come up with a reference bank and then start ideating on the basic form factor.

Everyone had to come up with multiple concepts and then all the concepts were discussed collectively and changes were suggested. The next phase was to develop some of the concepts and make quick lo-fi prototypes and see how things look and feel.

While all this was happening we were discussing open source, making and consumerism etc whenever we got time. And we also screened Shenzhen: The Silicon Valley of Hardware by WIRED to give the students the idea of what is happening in the world in terms of manufacturing, engineering and design. This one documentary ends up opening a lot of people’s eyes about manufacturing, making and open source.

These guys were progressing by making more detailed plans and models of the objects they had picked and we also started talking about the materials and processes which we’ll be using in making. And while all this was going on we reached Friday.

We also planned a basic introductory electronics workshop for the students over the weekend. For this two special guests Jon Rogers and Jens Alexander arrived to NID V on Friday evening. We introduced them with Arduino boards and got them to tinker around with basic output components. Within a matter of three hours the students were making LEDs blink, servos move and buzzers beep. It was really impressive. We had a small demo party in the courtyard.

We spent the entire next day working with Arduino and also introduced other output and input components. They had to come up with different stories using the electronics and it was really nice to see these guys who had never worked with electronics coming up with brilliant ideas and stories. And on Sunday we had a small feedback session with Jon and Jens sharing what they could do in future. Everyone had a really nice and eventful time during the weekend.


The next week everyone shifted to workshop and got into making their objects. A lot of new tools, processes and techniques were introduced during the time spent in the workshop. Everyone was in a state of flow and doing really nice work. By the time the week got over, most of the prototypes had reached functional stage, they required some aesthetical tweaking like painting and finishing.


And on Friday evening we sat down to discuss the learning we had over the past two weeks and also to critique each others work. One thing which was common among everyone was that they knew what their friends were doing as they were sharing their work and progress with each other since beginning. A lot of people got to appreciate the scale of things, some got to learn how important and critical are measurements and dimensions. For some it was just a reinforcement of the idea that they need to make more.

I was really content by the end of the workshop as everyone had outdone themselves and put them in a spot where they gave their best to learn new things and from each other. That’s the point of design to an extent, to make people believe that they can change the world by taking small steps at a time.

Some Folks


I’ll share the work of few of these Design Jedi in this post and will write a few more posts with others work in future.


The X-tool is a neat substitute for seating arrangements at social gatherings. Light weight makes it easy to move and re-arrange. Combine the Xtools and create a large table like structure for playing board games etc. The structure has been planned in such a way it creates minimum wastage and can been carved out from a single plank of wood. The three components have been ergonomically designed for 95 percentile.


It is a sitting and standing table which involves various functionalities, that can accommodate 4-6 people to sit or stand.

Ready to activate classroom /office /workshop /dining, Table Z offers the core sit-stand features and functionality that help support positive performance, collaboration and a good posture.I liked the idea of a table with a metal base and a wooden top that would have two different heights making it a multipurpose table.

The main intention to make Table Z is to avoid back stress and add movement in the body by making the users standing and working as well making it different from the traditional working space.


POP lamp made using Plaster of Paris and old plastic bottles. It provides a soft glow that blankets your space just enough for you to function without causing a harsh glare.


The Young Designers of PDUG’15 Part.2

An enthusiastic bunch with a lot of energy and some time super sleepy. This post shares the work of the next three young designers.

What do you think of a modular furniture that becomes a table or a personal seating space with one flip? Pieces and puzzles is what this box is inspired from. Take the modular piece, slide it in and it becomes a cushioned seating. To make it a table, simply slide it out, flip horizontally and settle it on the grooves. Cushion flips beneath as you flip the piece and you get a table to work on.

A lot of materials gets wasted each time we make something. Instead of wasting these materials , what if we can reuse it ? Material Box is an easy to make box , to dump extra materials , so that you can reuse them again. Can be put in the workshop as well as studio.

Ever felt like taking a power nap in the middle of the work but couldn’t find a proper place to straighten your back? Meet SleepTab.
It’s a two piece furniture specially made to take naps in the studio which when stacked becomes a low lying table and helps save space. The furniture looks like as if its stitched from the side view and has a quirky criss cross shoe lace weaving.


The Young Designers of PDUG’15

I got back to facilitating the product design students of National Institute of Design Paldi again for a two week long course on Making and Tinkering. This time the young designers were from sixth semester. An enthusiastic bunch with a lot of energy and some time super sleepy. In the course along with making, we discussed ideas about open design, digital fabrication, consumerism and the bigger role of a designer.

Initial ideas

We took the product design studio as our context (Where), and started looking at things and objects (What) which we wanted to incorporate to make it with the intention behind (Why) picking the object. It took a while to figure out these things. Once a particular path was picked the ideation process started and which further led to making of small scale prototypes. We discussed everyones ideas and everyone critiqued each others work and added and subtracted a lot of details from the prototypes.

Next phase was to finalize the form factor and then getting to the workshop to start building 1:1 scale working prototypes of the objects. It took some time for the young designers to figure out things. And during the entire phase of prototyping a lot of new techniques, tools and processes were introduced.


After the prototyping got over then next phase was to work on the aesthetics and add colors and finishes. The next task was to put all the objects in the studio and start testing and using it. This leads to them getting real world feedback on their objects and also leads to validation whether their ideas work or not. If not then what do they need to do in order to make. They were also documenting there work and process and wrote instructables. I’ll be sharing their instructables in this post and the upcoming posts.

Check out the work of this crazy bunch.

A little bit of greenery can liven up any room. But you may not really have the space for a few plants (or the time), so here’s an easy to make vertical frame to hold your plants and a simple watering bottle.

Can’t find pins when you need them?

Do your sheets get damaged due to board pins and staple pins? Is making sure your paper is straight a pain? Do sheets keep slipping out of the board pins? If these things about your display board do bother you, ‘P(A)INLESS’ is your solution.

Build a set of units which can be joined to create simple anywhere furniture. The individual units can be connected together to form stools, benches and small chairs for kids, etc.

The Rainy Parasol Installation

Scenario two The Rainy Parasol, deals with Resource boundaries, which are related to the resources, because the resources can also create a divide among people, societies, regions and countries.

We propose a cosy place situated at the west tip of Buda Island providing a different use and experience of a rainy day. A place where you can enjoy nature at its best, among plants, breeze and the sound of water.

Rainy Parasol Context Sketch

Scenario 2 seemed easy on paper but it took a lot of time and trials to get it done as it had a lot of component.

It rains a lot in Kortrijk and sometimes the rain makes the day seem very dull and grey. We wanted to use this rain and create a space from where people can appreciate this resource. We wanted this space to be a shelter during the rain and also be in an open space. We started looking at places which offer beautiful view of the city and found the vegetable garden maintained by VELT on the tip of the Buda Island to be an ideal place. We spoke to Frank and Peter from VELT about the idea of the parasol and they really liked the idea.

We wanted the Rainy Parasol to be a place where people can come and relax and enjoy nature among plants, the sound of the water.  We also asked people about what they would like to do on a rainy day, a lot of them wanted to watch movies, some of them wanted to be outside without getting wet and to feel a sense of warmth. Even on a non rainy day, just get your camping chair and enjoy the view. We also wanted to use the rainwater collected to be distributed to the plants. One more idea which we really wanted to incorporate was to give a feeling of warmth whenever it rained and to create a glow around the parasol. For that we thought of using lights which only work when it rains. And these lights needed to be off grid as there is no power source in the vegetable garden.

We started looking at ways to make the parasol, which was in simple terms, a funnel collecting water but at the same time big enough to provide shelter. We reached to Ronald from Industrial Design Center Howest to give us some leads on people making parasols, fabric structures etc. He gave us a few leads and we got down to writing to these people to help us or collaborate in making the parasol. One of the firms we got in touch with was Nomad Concept, an architecture firm building tensile fabric structure. We went to meet Amandus, an architect and head of Nomad in his Antwerp office. We saw some of the work he had done and it was really inspiring and nice. We hoped that he could make a structure for us but unfortunately the timing didn’t work out.

We thought that we’ll build the parasol on our own using metal tubes and sheets, but one day when we were out to buy material for the island we found a drying rack in Hubo, which was close to what we wanted to build as a structure. We started looking at ways to modify it according to our needs.

The installation had various sub assemblies. A brief description of them is given.

Drying Rack

The drying rack is like a giant inverted umbrella with 4 spokes made out of U shaped aluminum channel. The span of the spokes can be increased or decreased depending on where the central hub is on the pole.

Rack

Textile

The next crucial part of the build was to find a fabric which was waterproof and strong enough to withstand rain, sun and wind. We went to a lot of stores looking for fabric and had a really hard time finding one which met our size and colour constrains. In between we found plastic sheets used in shower curtains and tried to make a rough model of the water collecting part. Then after the prototype was done we got waterproof fabric from Euroshop, we cut the fabric to dimension and then got it stitched from Roos (Bolwerk). The water collector is composed of 4 pieces of waterproof textile stitched together and fixed to the parasol. The water collected by the textile is directed to a water storage mounted on the central pole. Textile

Light

As the light system had to be off grid we thought of using a windmill along with solar panel, but it was turning out to be too costly and there were some practical issues with installations of the windmill. Then we thought of using solar lights which could be activated with a switch. For activating the lights we thought of various ways. Initially we thought that we can use water as a conductor to close the connection between two wires to activate the light. That idea didn’t work perfectly as the resistance of water was too high. Then we started looking at sensors and thought that it was too complicated to repair them in case something goes wrong.

Then we finally decide to use a mechanical switch which gets activated by a container which gets filled with rainwater. We got solar lights from Brico and modified the circuit to only work when it rains. Max a volunteer at BudaLab helped in hacking the circuit to work with the end-stop rather than switching on automatically when the ambient light gets low. All the lights were chained to a single end-stop switch. The solar panel wire was extended and the switch was also connected to the lamp with a long wire as they were mounted at different places. Everything was sealed with silicon and hotglue.

Light

Water Storage

We needed storage also to collect the water which was being collected by the parasol and then divert that water into the containers through pipes. For the storage we found a waste bin in Brico which was fitting our size constrains. We also tried out various pipes but eventually settled on radiator pipes used in houses. We made a 6cm and three 1.5cm holes in the bin to fit the radiator pipe and the central pole. The good thing was that the pipes also come with brass connectors. So, it was easy to mount the pipes on the water storage.  Water storage and the pipes were painted white.

Water Storage

Water Containers

After a lot of searching in stores and online we finally found the containers which we wanted to use in the installation. We got the containers from a store in Paris. The containers have 3 holes on the top from which they can be suspended. We got white rope to tie the containers and also some pulleys to pass the rope and connect it with a counter weight and switch. A 2mm hole was made in the bottom of each container to let the water drain.

Water Containers

Central Pole

The height of drying rack was short. We got a new metal pipe in which the rack’s central pole could slide in and the two are locked in place using nut and bolt. The parasol will be put in the soil using a screw anchor. The pole and the screw was painted red.

Central Pole and Screw

Switch and Pulley

The end-stop was mounted on an L bracket along with a pulley. This pulley was connected to one of the buckets which when filled with water moves a counterweight up and triggers the end-stop and switches on the lights.

Switch and Pulley


The step by step process of assembling the parasol is explained using CAD sketches.

Parasol GIF

The four corners of textile container were punched and metal eyelets were put in them. Textile was connected to the rack’s U channels using nut and bolts.

This slideshow requires JavaScript.

Next holes were made in the U channels for mounting lights. Lights and the solar panels were fixed to the channels using zip ties. The wire from all the lights had to go to the central pole where the switch was to be mounted. Again zip ties were used to attach the wires along the channels to the central pole.

03

The L bracket with the pulley system was mounted on the pole using a M10 hex head nut and bolt. The end-stop was fixed to the bracket using zip ties and hot glue. Two other pulleys were mounted on the pole 120 degree from each other using M10 nut and bolt.


04

Parasol Switch Assembly GIF

The water storage along with the containers was slid into the pole and ropes were passed over the pulleys and connected to counter weights. The L bracket had two holes from which the rope passes. One end was connected to the container and the other was connected to the counterweight. The end-stop was mounted in such a way that when the counterweight go up because of the bucket getting filled with rainwater it pushes the end-stop and the lights go on. The other two containers were also passed over individual pulleys and then connected to a single counterweight.

This slideshow requires JavaScript.

This entire assembly was then inserted into the 6cm central pole. The water storage was fixed to the pole using a ring fastener and silicon was put to make it waterproof.

07.jpg

The assembled parasol can be put in a garden using a screw attachment which can be driven into the soil and then the central pole can be inserted into it and fixed into position using a bolt.

08.jpg